- Home
- FUN & Forums
- Victorian Crafts
Traditional Victorian Crafts
By Don Bell / Recipe Archivist and Compiler
Victorian crafts were very popular in the late 1800s. People desired to make decorative items that would beautify their homes and satisfy their need for a practical and inexpensive hobby.
As arts and crafts supplies were often unavailable in rural areas, creative artists made use of the simple materials they had at hand either in the home or found in surrounding nature.
Discover Traditional Victorian Crafts
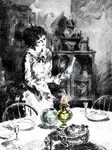
 Shell Craft Bouquet by Margaret McIlmoyle ca. 1920
(Source: ©Don Bell)
The Victorians created beautiful pictures and art objects using common, everyday items such as moss, cones, shells, seeds, bits of wood, paper, and even human hair.
Beads were cleverly made from rose petals and fashioned into keepsake necklaces and rosaries, and tiny shells were fashioned into beautiful floral pictures.
Why not try one of these interesting Victorian craft ideas? Create a colorful picture for your wall or try your hand at candle making or make a silhouette portrait of a loved one. They all would make great conversation pieces.
Explore Victorian Crafts
Art Recreations (1884)
Sea Shell Craft
 Sea Shell Craft
This fine example of sea shell art depicting a floral display was created by my Grandma McIlmoyle in the 1920s. Two of her beautiful sea shell pictures now grace our dining room walls.
She obtained the colorful shells by mail from a Canadian arts and crafts catalog. The popularity of this Victorian craft lasted into the mid
twentieth century, and some still practice the art.
Shell work is very pretty for vases, frames, boxes, etc. Many shell flowers, animals, birds, and the like, are brought here from the Mediterranean. We have seen some that we would like to own; but in general, they have a stiff appearance. However, we will tell you how they are made.
Assort your shells according to size and color — the more rice and other small shells you have, the better. Melt white wax and glue together, two parts of the former and one of the latter. Have a clear idea of what you intend to do, or, what is better, make a pattern before you begin to set your shells.
If you will ornament a box, a rose in the center looks well. Take thin round shells, those most resembling rose leaves, of the smaller size, and dipping the lower ends in the hot wax mixture, set them close together for the center of a rose; place other similar shaped shells around in circles, the largest outward.
Care must be taken to form the shells into perfect circles, and to take up wax enough to make them adhere to the cover. Shells of different form, say more oblong, can be used for leaves. After arranging such figures as you like with the shells you have, fill the spaces with the very small ones. Rice shells are the prettiest, but they are costly.
Some prefer sticking the shells into a puttied surface, which does very well. Varnish with a very little copal varnish, using great care.
Animals are made of thick pasteboard or turned in wood, and covered with one kind of shell.
Sea Shell Flowers:
The basis of each large flower is a piece of thick round pasteboard. The shells for petals are sometimes tinged with a watercolor, and the leaves made of green paper. Delicate sprays are made by threading small shells on fine wire. Thus made, with half a dozen huge black berries of wax on the top, in a vase all covered with shells, it will pass for the imported article.
Sea Shell Jewelry:
Ornaments for the hair are made from rice shells, thus: File down the conical end of the shell, and clean out the opposite end with a pin; pass a silver wire (a guitar string) through the filed end, bring it down and twist for a stalk. From fifteen to twenty pairs on one branch, neatly covered with white or green silk floss. Two or three such stalks of different lengths are sufficient. Satin beads wired with a guitar string, and wound in pairs to form sprigs, with now and then a tendril, are beautiful for evening dress.
In almost every family, enough shells, small and appropriate, can be found to make some ornamental article. Sea captains bring home valuable collections; and who among our readers has not some friends or acquaintances who "go down to the sea in ships "?
Moss Craft
Moss craft is relatively easy to accomplish and was a very popular Victorian craft with children and adults alike. Some beautiful, rustic moss pictures can be made using simple natural materials found in nature.
By collecting and arranging, in various forms of grace and beauty, the delicate and many-colored mosses with which our fields and forests abound, has long been a favorite pastime with all lovers of the beautiful in nature. Fertile imagination and inventive mind will readily perceive the many objects for which moss work is well adapted.
Vases neatly and tastefully covered with delicate mosses, arranged with an eye to the harmony of colors, are very appropriate for holding dried grasses; crosses; little towers, "ancient and moss-grown," for watch stands; frames for holding collections of leaves, grasses, or flowers — indeed, it is needless to particularize. Beautiful landscapes can be made, closely resembling nature.
Collect all the varieties of wood moss, beautiful bits of bark, and dried leaves, within your reach. Make a design, perhaps of a landscape, in which are ruins, bridges, rocks, etc. Paint a sky as in watercolors, then cut and glue thin bits of bark and moss on the ruins; moss on the rocks; dried forest leaves on the distant mountains, and the bright-colored and green mosses, of various hues, on the foreground.
Such a landscape is calculated to draw out the ingenuity of the pupil, and requires no little study, and when well done, is a very pleasant picture. Set in a deep frame.
The Art of Hair Work
 Hair Flowers
This popular Victorian craft was sometimes used to memorialize loved ones by fashioning their hair into flower-like hair wreaths which would be displayed in decorative glass cases.
To make hair flowers we need live hair — that is, hair from the head of a living person; annealed (tempered) wire, very fine; pearl or gold beads, scissors, a pair of pinchers, a bit of whalebone, and knitting needles of three sizes.
Brush the hair as smoothly as possible, and tie in bunches. Double a piece of wire in the middle, and twist about two inches.
Let us begin with a leaf. Take the twisted wire between the thumb and forefinger of the left hand for a handle, as it were; fasten to this the ends of a thin strand of smooth hair: (it is well to draw it several times between the thumb and finger to make it glossy).
Bend the ends of the wire to the right and left; then, holding the end of a knitting needle horizontally over the twist of the wire, pass the strand of hair around the needle, and fasten it by crossing the wires below to the right and left. So continue till you have woven sufficient for the leaf.
Slip from the needle, and you have nice loops neatly fastened by a fine wire much resembling gimp. Bend this into the desired shape, twist the ends of the wire, and cover with silk braid as near the color of the hair as possible.
 Hair Flower Bouquet
The leaves may be made of different sizes and varied by the size of the knitting needle. To make daisies, asters, etc., turn this looped wire round and round to present a flat surface; make firm by fine wire underneath.
It is well to have a pattern. If you cannot see hair flowers, take natural ones, and by fastening strands of hair to a wire, and binding with floss, endeavor to imitate Nature. With the pinchers you make your wire fast, and with the whalebone you obtain the desired width of a petal by laying the hair over it.
Thus, for a pansy, smooth a short strand of hair, fasten one end to a bit of wire, then pass the hair over the whalebone, winding to the same wire, but lower down; this makes it firm, and enables you to give it what form you like, by bending the wire. Make five of these petals, and set them around a wire having a pearl bead on its end.
Forget-me-not is a pretty little flower, and easy to make; put a gold bead in the middle. Roses require much time and great care; buds are easily made. Many persons moisten the hair with oil; but our experience teaches us that the work is much more durable and neater when smoothed by the friction of the fingers.
As it is often necessary to economize the hair as much as possible, it is well to state that as a rule, a piece of hair work is half the length of the hairs which make it. If you have but a scant pattern, use the short hairs first, not the shortest, but beginning with those perhaps of five inches in length, and then taking those which are longer.
Practice in this art is of more value than precept. The artist will find the difficulties gradually disappear as the work is persevered in, and to study specimens of hair work, now so common, will assist the learner in many points.
 Hairwork Designs from Catalogue of Artistic Hair Work, 1886
 (Source: Library of Congress Digital Collections)
Hair Work Resources:
Self-Instructor in the Art of Hair Work by Mark Campbell was first published in 1867, and it's freely available online at Project Gutenberg. It remains the most popular Victorian craft book for anyone interested in learning the lost art of hairwork.
The Catalogue of Artistic Hair Work published in 1886, by The National Artistic Hair Work Company (Chicago, Ill.) is a catalog of Victorian designs for artistic hair scenery, jewelry, and ornaments.
Making Window Transparencies
This Victorian craft was popular among young people and was used to decorate their rooms. Adults also enjoyed making translucent transparencies for the window.
Take some prettily colored landscape, and cut a slit into the broad lights of it [along the horizon] with a penknife; put a white paper of medium thickness behind it, and interline with orange or rose-colored paper; bind the three — that is, the landscape, the colored paper, and the paper which forms the back — together with some suitable color for a frame; now separate the cut edges of your landscape by pressing them apart.
Hang up in the window, and when the sun shines through, the effect is beautiful. Try it; we are sure you will be pleased.
Pine Cone Craft
This Victorian craft produced beautiful pine cone decorations for Fall and Winter months. The following is an excellent pine cone craft idea that could be adapted for making Christmas decorations.
Select good clear cones, and dissect some which have handsome, large scales, and brush them clean; lay nice white putty, or a similar adhesive substance, smoothly on your frame; set into this putty whole cones, large and small, in such figures as suit your taste, and fill the entire groundwork with the scales, lapping one neatly over the other.
Cut oval and round frames for light pictures, from bookbinder's pasteboard, and cover with the scales in layers or rows. Scallop the edges with small whole cones, set in large cones surrounded by little ones equidistant, if the frame be broad, and fill in with the scales. When dry, take out those which are not firm, and replace. Add acorns ad libitum.
Varnish the whole once or twice. If you wish something nice, go over every part with a fine brush, and leave no varnish standing in drops. Cones can be found by almost anyone in an hour's walk through pine woods.
Indeed, if one has a taste for the beautiful, and is quick in perception, it is impossible to ramble through woods and fields without finding many curiosities in the shape of mosses, grasses, cones, etc.
Decorative Seed Craft
As an alternative to using wild tamarind seeds, save your cucumber and musk melon seeds to use with this Victorian craft.
Wild tamarind seeds come into our market from the West Indies. They are about the size and color of apple seeds, but hard as stone. We tried various chemical solutions to soften them, but in vain.
Finally, we soaked them in air-slaked lime some eight or ten hours, then wiped them with a rag wet in sweet oil. After this process they were soft enough to admit of being pierced by a needle.
Our lady friends used them, with gold and silver beads, for purses, bags, baskets, bracelets, ear-drops, etc. When dried they returned to their pristine hardness, and formed durable and useful ornaments.
Seeds of Cucumber and Musk Melon can be worked with steel beads so as to make handsome dress bags and table ornaments. They should be lined with silk appropriate to the beads; for example, a rich green, cherry color, or black.
A person of taste can make many very pretty things by arranging the seeds and varying the beads. Try it for bags, mats, catchalls, baskets, plates, and table ornaments.
Victorian Craft: Rose Petal Beads
The Perry Home Cook Book (1920)
 Handmade Rose Petal Beads
(Source: ©Don Bell)
How to Make Rose Petal Beads
Young women enjoyed the unique Victorian craft of making handmade jewelry using beads fashioned from dried rose petals.
Necklaces, bracelets, and earrings made of rose beads are really quite beautiful and rose petal rosary beads became cherished family heirlooms, especially when the petals were from a loved one's rose garden.
Rose petal beads are a conversation piece whenever they are seen, and they make beautiful heirloom keepsake jewelry. Enjoy trying your hand at this Victorian craft and
make rose beads from your favorite roses this season.
Run the rose petals through a food grinder and place dish to catch juice. Pour the juice over the pulp and spread on iron baking pan; leave 24 hours, turning occasionally so that all the mass will be brought in contact with the iron, as this is what makes the heads jet black. Then run the pulp through the chopper again.
Repeat the process nine times. By this time, the mass has taken on the appearance of a coal black dough. At the end of the ninth day, roll out. If the dough is too dry, moisten with water. Mold into desired bead shape and use a wire or hat pin to pierce. The rose beads may be left on wire or pin to harden.
Tips for Rose Bead Making
Keep in mind that the rose beads will shrink in size when dried, so form them slightly larger than you wish them to be when finished.
Leave the dried beads as they are if you want a dull finish. For a more polished surface, rub the dried beads between your palms with a very tiny bit of Vaseline.
After removing the pins, string the dried beads on a linen thread and store them in a tightly closed box to preserve their rose fragrance when not being worn.
Victorian Craft: Glass Transfer Pictures
The Book of Knowledge and Sure Guide to Rapid Wealth (1873)
How to Transfer Pictures Onto Glass
My great aunt enjoyed this Victorian craft. I recall seeing numerous glass transfers decorating the walls of her house.
The new and beautiful art of transferring onto glass colored or plain engravings, photographs, lithographs, watercolors, oil colors, crayons, steel plates, newspaper cuts, mezzotinto, pencil, writing, show cards, labels — or in fact, anything.
Take glass that is perfectly clear — window glass will answer — clean it thoroughly; then varnish it, taking care to have it perfectly smooth; place it where it will be entirely free from dust; let it stand overnight; then take your engraving, lay it in clear water until it is wet through (say ten or fifteen minutes) then lay it upon a newspaper, that the moisture may dry from the surface, and still keep the other side damp.
Immediately varnish your glass the second time, then place your engraving on it, pressing it down firmly, so as to exclude every particle of air; next carefully rub the paper from the back, until it is of uniform thickness — so thin that you can see through it, then varnish it the third time, and let it dry.
Victorian Craft: Making Wax Candles
The Household Cyclopedia of General Information (1881)
How to Make Wax Candles
Candle making possesses a long tradition. This Victorian craft is performed with little change from the way taper candles were made during the Medieval and Renaissance Eras. Here's how to make homemade candles the authentic, old fashioned way.
Place a dozen wicks on an iron circle [wicks tied to a circle made of heavy wire or simply lengths of wire would also work], at equal distances, over a large copper vessel tinned and full of melted wax; pour a ladleful of the wax on the tops of the wicks, one after another; what the wick does not take will drop into the vessel, which must be kept warm by a pan of coals; continue this process till the candles are as large as required.
If they are wanted of a pyramidal form, let the first three ladlesful be poured on at the top of the wick, the fourth at the height of three-quarters, the fifth at half, and the sixth at a quarter; then take them down hot, and lay them beside each other in a feather bed folded in two [or between feather pillows] to preserve their warmth and keep the wax soft; then take them and roll them one by one on a smooth table to shape, and cut off the thick end as required.
Victorian Craft: Silhouette Drawing
Scientific American (April, 1885)
 Enjoy Silhouette Portrait Drawing
(PD Source: Scientific American, 1885)
Silhouette Portrait Drawing
Thanks to this Victorian craft, a silhouette portrait of a loved one makes a wonderful keepsake when framed. Here are easy directions on how to make a silhouette likeness.
Take a large sheet of paper, black on one side and white on the other, and affix it to the wall, white surface outward, by means of pins or tacks or tape.
Place a very bright light upon the table, at a proper distance, and allow the person whose portrait it is desired to form to stand between it and the wall. Then, with a pencil, draw the outlines of the shadow projected.
While this is being done, it is very necessary that the subject shall keep perfectly immovable. When the outlines are sketched, remove the paper from the wall and cut out the portrait.
After this, all that remains to be done is to turn the portrait over and paste it to a sheet of white paper. The silhouette is profiled in black, and if the operation be skillfully performed, the resemblance will be perfect. —La Nature
You Might Like These
The Acres of Diamonds Story - Discover Your Own Field of Diamonds
Read the Acres of Diamonds story from Russell H Conwell's classic book. Discover how you can generate income right where you are — working at home online.
Remember Classic TV Shows From the Golden Age of Television
Relive fond memories of Classic TV Shows and their unforgettable stars. Share stories and trivia about your favorite shows from the Golden Age of Television.
Listen to Old Radio Shows Online for Free - Experience the Fun
You can listen to old radio shows online. Sit back and enjoy shows from the Golden Age of Radio including The Whistler, Amos 'n' Andy, Gunsmoke, and more.


Sign Up now for GRANDMA'S DESSERT CLUB and download your FREE PDF COPY of Grandma McIlmoyle's Little Dessert Book. Also receive my regular Bulletin featuring classic recipes and nostalgia.

Don Bell, Founder & Archivist, Old Fashioned Dessert Recipes. Don has spent over two decades preserving heritage dessert recipes from handwritten family notebooks, recipe scrapbooks, and vintage cookbooks. His collection spans hundreds of authentic, old fashioned recipes presented exactly as originally written.

Hi! I'm Don Bell, and I love sharing Grandma's heritage dessert recipes, and the nostalgia they bring to mind. Have fun making all your favorite desserts from childhood.


SCAN and have access to Grandma's Recipes on your CELLPHONE
Readers are saying…
I just briefly want to say thanks for publishing such a warm, cozy site that just feels like, well, home. —Dusty, U.S.A.
This website is extraordinary to people my age who remember their pasts fondly and miss all those who have gone before.
Your Grandma's homemade dessert recipes add greatly to those memories, and I wanted to tell you that your efforts here are very special indeed. —Maureen, Canada
You have a great site! So homey with precious recipes. —Miriam, USA
Homemade-Dessert-Recipes.com does not sell any personal information. This site uses cookies for its operation and to enhance your experience. Privacy Policy
Copyright © 2004–2026 by Don Bell
All Rights Reserved Worldwide.