- Home
- Holiday Dessert Recipes
- Traditional Easter Dessert Recipes
- Easter Bunny Cake Recipe
4 Vintage Easter Bunny Cake Recipes
By Don Bell / Recipe Archivist and Compiler
Here are several vintage Easter Bunny Cake recipes to choose from. The cute 3D bunny resting on a grassy nest decorated with colorful jellybeans is an easy-to-make layer cake meant to entice any dessert lover.
And just imagine marshmallow bunnies dancing in their patch of grass on a chocolate stage beneath a pink umbrella! What could be more Spring-like?
The little marshmallow rabbits with their pink noses and eyes are simply irresistible. Kids of all ages love them, and they also make perfect cake toppers for decorating birthday cakes. The best part is… you get to eat them!
Vintage Easter Bunny Cake Recipes
Mom's Recipe Scrapbooks (c. 1920s)
3D Easter Bunny Cake
 3D Easter Bunny Cake for Your Easter Table
(PD Source: Adapted From Retro Ad)
Use your favorite angel food cake recipe or cake mix (yellow cake mix may be used if allowed to stand one day before cutting to ensure firmness). Bake two (2) regular 9-inch round layers following directions on package.
Draw pattern on heavy note paper or thin cardboard, as shown in diagram (below). Cut out pattern pieces and arrange on one cake layer. Use a sharp knife to cut out pieces of cake.
Following the diagram, assemble 3D body of bunny on center of second cake layer, making sure it stands up straight as illustrated.
 Easy 3D Easter Bunny Cake Pattern
(PD Source: Adapted from Retro Ad)
Frost entire body of bunny with white icing (use 1/4 cup tinted pink icing on both sides of ear). Place legs into position. Affix tail to bunny by using toothpick. Frost legs and tail.
Cut pink jellybean in half, and use 1/2 for each eye. Use a whole pink jellybean for nose. Cover entire bunny including ears with Durkee® flaked white coconut. Brush away any fallen coconut from top on base.
Frost base with white icing and cover with 1 cup green-tinted flaked coconut, OR simply frost base with green-tinted icing. Decorate base with jellybeans.
Whimsical Easter Bunny Cake
 Make a Whimsical Easter Bunny Cake
(Source: Adapted From Retro Ad)
Bake and cool an 8-inch round layer cake and an 8-inch square cake. Measure in 1 inch from corner on one side of the square and 2 inches from corner on opposite side. Repeat on opposite side of square. Cut off both strips. Next, cut two 1-inch strips from the wide end of remainder, for legs. Arrange cake pieces as shown in the pattern (below).
 Whimsical Easter Bunny Cake Pattern
(Source: Adapted From Retro Ad)
Decorate with Seven Minute Frosting. Set aside 1/2 cup white frosting, and tint the rest yellow. Spread yellow frosting on top and sides of cake. Use marshmallows for tail and paws and frost with white frosting.
Sprinkle cake with 1-1/2 cups flaked coconut (optional). Decorate with mint candies, gum, licorice string, and a colorful Easter egg. Have fun using your creativity.
3-Layer Vanilla Easter Bunny Cake
 Enjoy an Old Fashioned Easter Bunny Cake
(PD Source: Don Bell)
Isn't this vintage Easter Bunny Cake recipe perfect for Easter? And the 3-layer vanilla cake is absolutely delicious and easy to make, so no cake mix is needed!
When you place this masterpiece on your dessert table, there's sure to be a gasp of appreciation from your young guests!
Ingredients:
3/4 cup shortening
1-1/2 cups sugar
1 teaspoon salt
1 teaspoon vanilla extract
3 eggs at room temperature
3 cups sifted all-purpose flour
4 teaspoons baking powder
1/2 cup water
1/2 cup pineapple juice, or milk
Red (pink) food coloring, as desired
Directions:
Cream shortening by beating in a large mixing bowl. Add sugar, salt, vanilla. Cream till fluffy. Add eggs one by one, beating well each time. Sift together cake flour, baking powder into another large bowl. Add flour mixture alternately with liquids to batter. Blend thoroughly.
Line three round 8-inch cake pans with waxed paper or parchment paper.
To create marbled coloring, measure half of batter into the round pans. Stir in drops of red food coloring in remaining cake batter to obtain desired color. Add this. Cut batter with a dull knife to marbleize.
Bake 8-inch cakes at 350°F (moderate oven) about 23 minutes, or until done when tested with a wire cake tester. Remove from oven and let cool on wire racks.
Seven Minute Frosting
2 unbeaten egg whites
1/4 teaspoon salt
1-1/2 cups granulated sugar
2 teaspoons white corn syrup
1/3 cup pineapple juice (instead of the usual water)
Place above ingredients over rapidly boiling water. Beat slowly for 1 minute to mix, then whip till mixture will hold a peak about 4 minutes longer.
Remove from heat and add 1 teaspoon vanilla flavoring. Continue beating until desired spreading consistency is reached.
Grandma's homemade vanilla buttercream frosting is also delicious on this fun cake.
How to Decorate Easter Bunny Cake
Grandma's Tip
To tint coconut flakes or shredded coconut green, add it to water mixed with a few drops of green food coloring, then spread on clean paper towels to dry. Tint coconut pink in the same manner.
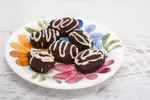
After assembling the cake layers and frosting the outside of the cake with the seven-minute frosting, melt one square unsweetened chocolate, dribble melted chocolate back and forth on frosting on top of the cake. Draw toothpick other way for a crisscross effect.
Finish decorating sides of the cake with green tinted coconut as illustrated. Position marshmallow bunnies on a small patch of green coconut.
Sprinkle mini Easter eggs or colored jelly beans around the cake for an added wow effect. And don't forget the umbrella, a colorful cupcake liner supported by a toothpick.
How to Make Marshmallow Bunny Cake Topper
These edible cake toppers are not only perfect for cake decorating at Easter time, but you can use them on pies, puddings, and cupcakes too. Making them is so much fun!
What's more, you can even use them as place settings to prettify your Easter dinner table.
 Bunny
BunnyMake these marshmallow cake toppers before starting the vintage Easter Bunny Cake recipe so you'll have them handy when decorating.
To make a marshmallow Easter Bunny, simply follow the step-by-step instructions. You will need a clean work surface, and a pair of sharp scissors, as they cut more easily than a serrated knife.
You'll also need a large white marshmallow that is dry and firm for each bunny. Large marshmallows are just the right size for the entire bunny.
Use scissors to make cuts in the marshmallow as shown on the diagram below, following the direction of the blue-colored arrows.
 Make Cuts as Shown
You'll need to make the following cuts:
- To fashion the bunny ears, snip the long top edges of the marshmallow as shown.
- For the bunny's head, cut up in a V-shape at the short end of the marshmallow.
- For the tail, cut a downward V-shape at the opposite end of the marshmallow.
- At the marshmallow's bottom, make two little cuts for feet along the front edges.
Next, sculpt and shape the body of the bunny by pinching the marshmallow with your fingers. Gently press down between the ears and in at the sides. Pinch the nose and the tail so they stand out from the body, also the feet.
Now paint the bunny eyes and face with a toothpick dipped in pink or red food coloring.
Try not to be discouraged if your first white bunny isn't perfectly shaped. Just eat him, and make another! It will take a little practice, but you will soon be making the cutest marshmallow bunnies you ever saw.
And they taste every bit as good as they look too!
Easy Homemade Easter Bunny Cake
 Quick and Easy Homemade Easter Bunny Cake
(Source: Adapted From Retro Ad)
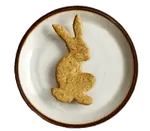
Begin with a freshly baked 9-inch square cake for this bunny. Use either an old fashioned cake recipe or your favorite cake mix. After the cake has cooled, cut two 1-1/2-inch strips from one side of the cake for the bunny's ears. The large remaining piece is for the bunny's face.
 Cutting
 Frosting
Arrange the cake pieces on a serving tray, as shown. Then spread a fluffy white Seven Minute Frosting over top and sides of the bunny's face and ears, making it swirly instead of smooth.
Generously sprinkle coconut to give your bunny lots of snowy-white fur, with a little pink-tinted coconut for inside the ears, or simply use a little pint-tinted frosting.
Jellybeans can be used for eyes, nose, and mouth, and black licorice string can be used for edible whiskers. You can also use pink pipe cleaners for whiskers, if available.
About the Vintage Easter Bunny Cakes
 Everybody Loves Bunnies at Easter Time
Source: ©e_kulik/Depositphotos.com)
Everybody loves a cute little bunny rabbit, especially at Easter time. And nobody can resist edible marshmallow bunnies cavorting on top of an Easter cake.
I can recall Mom first making this vintage Easter Bunny cake recipe, and the little marshmallow rabbits to decorate it, but once she also made them for my birthday.
Instead of the usual birthday cake, she used this original recipe to prepare a special cupcake for each guest.
Imagine a cute little rabbit holding a small birthday candle between its paws sat on a tuft of green coconut icing on top of each cupcake. Naturally, they were a huge hit with the kids.
Believe me, the "little long-ears" in your family will love this theme cake. Truly, this easy Easter cake will delight everyone who sees it displayed on the Easter table. And you cannot begin to imagine how good it tastes!
Keep this vintage Easter Bunny cake recipe handy. This is one homemade dessert cake that you'll have fun making and even more fun serving at your Easter celebration.
Take a peek at Grandma's traditional Easter Cake recipes if you would like to make a Giant Easter Egg Cake or another cake that would brighten your Easter table.
You Might Like These
Traditional Easter Cake Recipes: Delicious Chocolate Layer Cakes
Get Grandma's Traditional Easter Cake recipes and make a Giant Easter Egg Cake without needing a mold, plus 3 additional dessert cakes for Easter or Spring.
Old Fashioned Chocolate Easter Eggs: How to Make Candy Eggs
Get recipes for Grandma's old fashioned chocolate Easter Eggs. Enjoy making a variety of homemade chocolate coated eggs with delicious fillings.
Old Fashioned Easter Bunny Cookies Recipe - Grandma's Favorite
Get Grandma's old fashioned Easter Bunny cookies recipe and make adorable cookies shaped like Easter Bunnies and some shaped like colorful Easter Bonnets.


Sign Up now for GRANDMA'S DESSERT CLUB and download your FREE PDF COPY of Grandma McIlmoyle's Little Dessert Book. Also receive my regular Bulletin featuring classic recipes and nostalgia.

Don Bell, Founder & Archivist, Old Fashioned Dessert Recipes. Don has spent over two decades preserving heritage dessert recipes from handwritten family notebooks, recipe scrapbooks, and vintage cookbooks. His collection spans hundreds of authentic, old fashioned recipes presented exactly as originally written.


Hi! I'm Don Bell, and I love sharing Grandma's heritage dessert recipes, and the nostalgia they bring to mind. Have fun making all your favorite desserts from childhood.


SCAN and have access to Grandma's Recipes on your CELLPHONE
Readers are saying…
I just briefly want to say thanks for publishing such a warm, cozy site that just feels like, well, home. —Dusty, U.S.A.
This website is extraordinary to people my age who remember their pasts fondly and miss all those who have gone before.
Your Grandma's homemade dessert recipes add greatly to those memories, and I wanted to tell you that your efforts here are very special indeed. —Maureen, Canada
You have a great site! So homey with precious recipes. —Miriam, USA
Homemade-Dessert-Recipes.com does not sell any personal information. This site uses cookies for its operation and to enhance your experience. Privacy Policy
Copyright © 2004–2026 by Don Bell
All Rights Reserved Worldwide.