- Home
- Drinks and Sodas
- How to Carbonate Drinks
How to Carbonate Drinks
Learn how to carbonate drinks naturally, so you can brew your own root beer, ginger beer, fruit juices, or flavored syrup beverages right in your own kitchen simply by following the easy instructions below.
I will share with you the secrets of natural soft drink carbonation and how to stabilize the carbonation level in five easy steps. We'll also briefly examine two methods of forced carbonation, so you can make an informed choice on how best to prepare your beverages.
How to Carbonate Drinks Naturally
 Old Time Soda Fountain Serving Carbonated Beverages
(Source: ©everett225/Depositphotos.com)
Follow the five basic steps to naturally carbonize your homemade beverages. Each step is easy and doable provided you don't rush.
1. Prepare the Drink Mixture
Follow the homemade root beer or ginger beer recipes to make the flavored drink mixture, making sure that the sugar is completely dissolved in the heated liquid.
Once you know how to carbonate drinks, you can develop your own recipes to carbonate almost anything, but experiment with the proven recipes for now.
If the mixture has to sit for any length of time before the yeast is added, cover it with a sanitized lid or aluminum foil to prevent contamination by airborne yeasts.
You'll likely want to adjust the ingredient quantities in some recipes to make smaller amounts. Anywhere from 1 to 5 gallons may be made at a time, but since refrigerated storage beyond 3 weeks to a month is not recommended — because of the ability of the yeast to develop higher levels of alcohol — make only what you can realistically consume.
2. Prepare and Add the Yeast
For the novice brewer learning how to carbonate drinks, dried yeast that comes in small individual packages is the easiest to store and use.
Prepare the yeast according to directions, and stir it thoroughly into the flavored drink mixture. If the mixture has been heated to dissolve the sugar, add the yeast after the mixture has cooled lukewarm. Some brewers say yeast performs best around 70°F (21°C).
To insure a healthy fermentation, prepare (hydrate) your dry yeast before pitching it into your mixture. Prepare (hydrate) or "proof" the yeast by adding it to 1/4 cup of lukewarm water, not over 80°F (27°C), then cover the cup with a sterilized saucer to prevent airborne yeast from entering, and let it sit.
After about 5 minutes, stir the yeast mixture to prevent clumping, and then allow the yeast to proof for an additional 15 to 20 minutes.
Always delay proofing your yeast until your drink mixture is almost ready to bottle. Proofing more than half an hour could make the yeast sluggish.
Always stir the proofed yeast to remove any clumps before you pour it into the mixture.
If the drink mixture has been heated, confirm that it has cooled to a lukewarm temperature no higher than 80°F (27°C) before you pitch your yeast into the mixture. If the mixture is too hot, you will kill the yeast resulting in no carbonation, so be sure the temperature is low enough.
NEVER use the quantity of yeast called for in the old fashioned beverage recipes. Remember, these are nineteenth-century recipes. The yeast available then was not as good as today's yeast, as yeast quality has improved dramatically in recent years.
Overusing yeast will lead to over carbonation, and a strong yeasty taste.
Only use about 1/8 to 1/4 teaspoonful of dried yeast for each recipe despite what the recipe calls for — no more than 1/2 teaspoonful. But, as each recipe is different, you may have to experiment to determine the correct amount of yeast to use.
EXPERIMENT is the operative word to remember when learning how to carbonate drinks.
3. Bottle the Soft Drink Mixture
Within 10 minutes of stirring your prepared yeast into the mixture, begin to pour and strain the mixture into your clean, sanitized bottles, filling them to within 1 inch of the top, and then tightly cap the bottles.
Occasionally, stir the mixture while bottling to ensure the yeast is evenly distributed, and try to pour the mixture steadily without splashing, as increasing the oxygen levels can influence the fermentation.
The use of a kitchen funnel may help while pouring. It is also a good idea to place the bottles to be filled in an empty saucepan to catch any overflow and prevent a sticky mess.
The mixture will properly ferment and produce the necessary carbon dioxide bubbles while in the capped bottle.
The preferable fill level is about one inch from the rim of the bottle and this holds true for all bottle sizes. Overfilled bottles tend to be under-carbonated and under-filled bottles tend to be over-carbonated when you're learning how to carbonate drinks.
The one inch of air space in the bottle allows enough room for the carbon dioxide to expand and create a proper seal in your bottles. Apply this rule to all bottles whether they are made of glass or plastic.
If you would like to add a touch of pizzazz to your bottled beverage, you can stir a few drops of food coloring into the mixture right before bottling. The food coloring will improve its appearance as some natural ingredients may cause the beverage to appear muddy or murky looking.
Experiment by using different colors to give your soda pops a unique and appealing appearance.
After you've finished bottling, thoroughly clean all the used equipment and utensils, dry them well on a rack, and store them dust-free in a box until their next use.
IMPORTANT: Once you stir the proofed yeast into the flavored mixture, do not allow the mixture to ferment for the length of time called for in the old fashioned beverage recipes.
Bottle the mixture IMMEDIATELY to discourage the development of alcohol. Again, remember that these are nineteenth-century recipes timed for nineteenth-century yeasts.
4. How to Carbonate Drinks
Allow the capped bottles time to naturally carbonate by letting them sit upright inside a closed cardboard box at room temperature, ideally around 65°F to 68°F (18°C to 20°C), for 3 to 4 days, but usually never longer.
During this time, it is best to keep the bottles in a dark place not close to a bright light source. If carbonation is not achieved in 3 days, you may expose the bottles briefly to sunlight until it is achieved.
Be sure to check the bottles periodically. While carefully holding them upright, and without shaking or jarring them, look for the telltale fermentation bubbles. The appearance of bubbles indicates that the beverage is carbonated. You can see the bubbles easier if you hold the bottle up to the light.
The first time you do this you might have to open one of the bottles to verify carbonation. With practice and observation, you will soon be able to judge when the beverage is properly carbonated.
If you are using plastic bottles, you can easily verify fermentation by their expansion to firmness. Carefully squeeze the plastic bottle and if it feels firm and quite hard, it is properly carbonated.
5. Stabilize the Carbonation Level
DO NOT allow your beverages to over-ferment. For those learning how to carbonate drinks, it's always tempting to let the fermentation process go on too long.
When carbonation appears to be right, immediately place the bottles into the refrigerator to halt the fermentation process. Allow them to remain upright in the refrigerator for at least a day or two to “ripen” and improve in taste.
If your refrigerator interior is large enough, you can simply place the closed cardboard box with the soda pop right inside the refrigerator.
Or, place each bottle within a sealed plastic bag. This is recommended, as it will save you from having to clean out the refrigerator if a bottle explodes or pops its cap while ripening.
DO NOT leave the bottles in a non-refrigerated condition after carbonation has been achieved since the fermentation process will continue, resulting in higher levels of alcohol, and the very real possibility that the bottles might eventually explode, spewing their contents.
CAUTION: Because homemade carbonated drinks do not contain the preservatives found in most commercial products, they cannot be kept for the same length of time without spoiling.
Carbonated drinks should not be kept for longer than 3 or 4 weeks and they are best drunk within a week or two when at their peak of perfection. However, this shouldn't present a problem since it's so good tasting!
One Final Step
I know I said there were only five steps in learning how to carbonate drinks, but you need to do one more thing if you want to make consistently good carbonated sodas. The extra few minutes of time it takes will more than repay your efforts.
What could be considered the final step is to evaluate the results of your efforts in a simple notebook or journal. If you faithfully do this, you'll know how to carbonate drinks and obtain consistent results every time.
Keep descriptive notes on everything you do with each batch that you make, especially if you make any changes to the recipe's ingredients or procedures. If you do this, you'll be able to reproduce the batch with similar results, or modify the recipe later to suit your preferred taste.
First observe. Carefully pour the finished, chilled beverage into a clear glass and evaluate it. Notice the bubbles, the color, the aroma, and the taste. How was it? Was it sensational? Or just okay? Or terrible? How could it be improved the next time?
It's also important to note the reactions of your friends, but be aware that people often have strong preferences. Remember those tiresome Coke® versus Pepsi® ads? There will always be someone who will prefer commercial beverage taste over homemade.
Record the results in your notebook along with any recommendations for future batches. And be sure to record the failures too. It's very easy to forget a mistake and its causes.
You'll soon become skilled at soft drink carbonation, and a true connoisseur of naturally carbonated drinks. You'll know how to carbonate drinks of almost any flavored mixture, and enjoy discovering your personal favorites.
Forced Carbonation Method
 CO2-Powered Soda Fountain Dispensing Carbonated Drinks
(Source: ©mikeshots/Depositphotos.com)
Not satisfied with knowing how to carbonate drinks naturally, some home soda fountain enthusiasts install an actual CO2 powered commercial soda fountain similar to those used in fast-food restaurants and bars.
The equipment consists of a carbonator unit, CO2 powered syrup pumps, and a dispensing unit with an ice container. The carbonator unit combines CO2 gas with ordinary drinking water to produce soda water by a method called forced carbonation.
However, unless you have deep money pockets, you would need to find a secondhand unit for sale in working condition, since new equipment can cost several thousand dollars.
Commercial soda fountains also require some technical know-how and frequent maintenance, and you'll need to source out a commercial supplier of flavored soda syrups.
You will also be working with canisters of CO2 gas under pressure so safety is always a concern. Naturally, this route is best reserved for the serious soda fountain hobbyist.
Information is available online if you are adventurous and interested, but you would need to drink many cases of homemade soda to recoup the equipment, installation, and operating costs.
These two information sources will get you started: Carbonating at Home and How to Install a Soda Fountain.
However, there IS a simpler, cheaper alternative that we'll examine below.
EASY Forced Carbonation Method
Would you like to know how to carbonate drinks using a less complicated, much less expensive method of forced carbonation? A common CO2 soda siphon, also called a seltzer bottle, offers the best practical alternative.
Whenever I think of seltzer, I'm reminded of Moe, Larry, and Curly having a sparkling water fight with seltzer bottles in Three Little Pigskins, a short Three Stooges film from 1934.

Soda siphons are commonly available, very affordable, easy to use, and completely portable. Replacement CO2 cartridges are also commonly available and reasonable in cost.
You can use a soda siphon to force carbonate almost any beverage, including fruit juices, ordinary drinking water, and soda syrup flavored beverages. You'll be able to enjoy homemade carbonated beverages at any time.
However, there is a downside to using forced carbonation. You won't have the fun of learning how to carbonate drinks the all-natural way using my 5-step home brewing method above, and you won't get to enjoy the distinctive yeasty taste of naturally brewed beverages.
The upside to using seltzer bottles? You could enjoy a sparkling water fight with your friends!
Naturally Carbonated Commercial Beverages
 Fentimans Botanically Brewed Commercial Beverages
(Source: ©Don Bell)
Once you've learned how to carbonate drinks, you might want to compare your carbonated results to a commercial brand and Fentimans is one of the best.
Fentimans is a Northumberland-based commercial bottler in the United Kingdom. They are one of the few remaining brands that naturally brews its soft drinks, employing a traditional 7-day brewing and fermentation process.
Fentimans brand "Botanically Brewed" ginger beer and colas are available for purchase in the U.K., and at some North American supermarkets. Look for them! They're delicious!
 WW2 Era Carbonated Soda Illustration for RC Cola
(PD Source: Calling All Girls Magazine July 1944)
You Might Like These
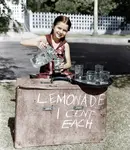
Old Fashioned Lemonade Recipes - The Best Homemade Lemonade Ever
Get old fashioned lemonade recipes and enjoy both standard and fancy lemonades that were once sold at old fashioned soda parlors. Delicious and refreshing.
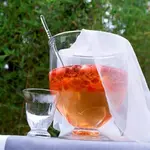
Raspberry Shrub Recipes - Enjoy Delicious Vintage Thirst Quenchers
Get Grandma's raspberry shrub recipes and make refreshing thirst quenchers for the hot days of summer. Enjoy these Deliciously wholesome vinegar drinks.
Egg Shake Recipe - Want a Change? Enjoy Out of This World Egg Drinks
Get egg shake recipes invented by old time soda parlor operators. Want a change? Enjoy frothy egg shakes with unique flavors that taste totally delicious.

Sign Up now for GRANDMA'S DESSERT CLUB and download your FREE PDF COPY of Grandma McIlmoyle's Little Dessert Book. Also receive my regular Bulletin featuring classic recipes and nostalgia.

Hi! I'm Don Bell, and I love sharing Grandma's heritage dessert recipes, and the nostalgia they bring to mind. Have fun making all your favorite desserts from childhood.


SCAN and have access to Grandma's Recipes on your CELLPHONE
Readers are saying…
I just briefly want to say thanks for publishing such a warm, cozy site that just feels like, well, home. —Dusty, U.S.A.
This website is extraordinary to people my age who remember their pasts fondly and miss all those who have gone before.
Your Grandma's homemade dessert recipes add greatly to those memories, and I wanted to tell you that your efforts here are very special indeed. —Maureen, Canada
You have a great site! So homey with precious recipes. —Miriam, USA
Homemade-Dessert-Recipes.com does not sell any personal information. This site uses cookies for its operation and to enhance your experience. Privacy Policy
Copyright © 2004–2026 by Don Bell
All Rights Reserved Worldwide.